
About the project: Paint Program with Scratch 3.0

In this project, you will be create your own paint program with Scratch 3.0!
The project creates a coloring palette for you to make your own drawing. You can change the colour of the pencil, clear the screen, erase the mistakes and much more!
What you’ll Learn:
- To use the Pen extension in Scratch?
- How to use broadcasts to communicate between sprites?
- How to detect mouse events?
paint program with Scratch 3.0 Code:
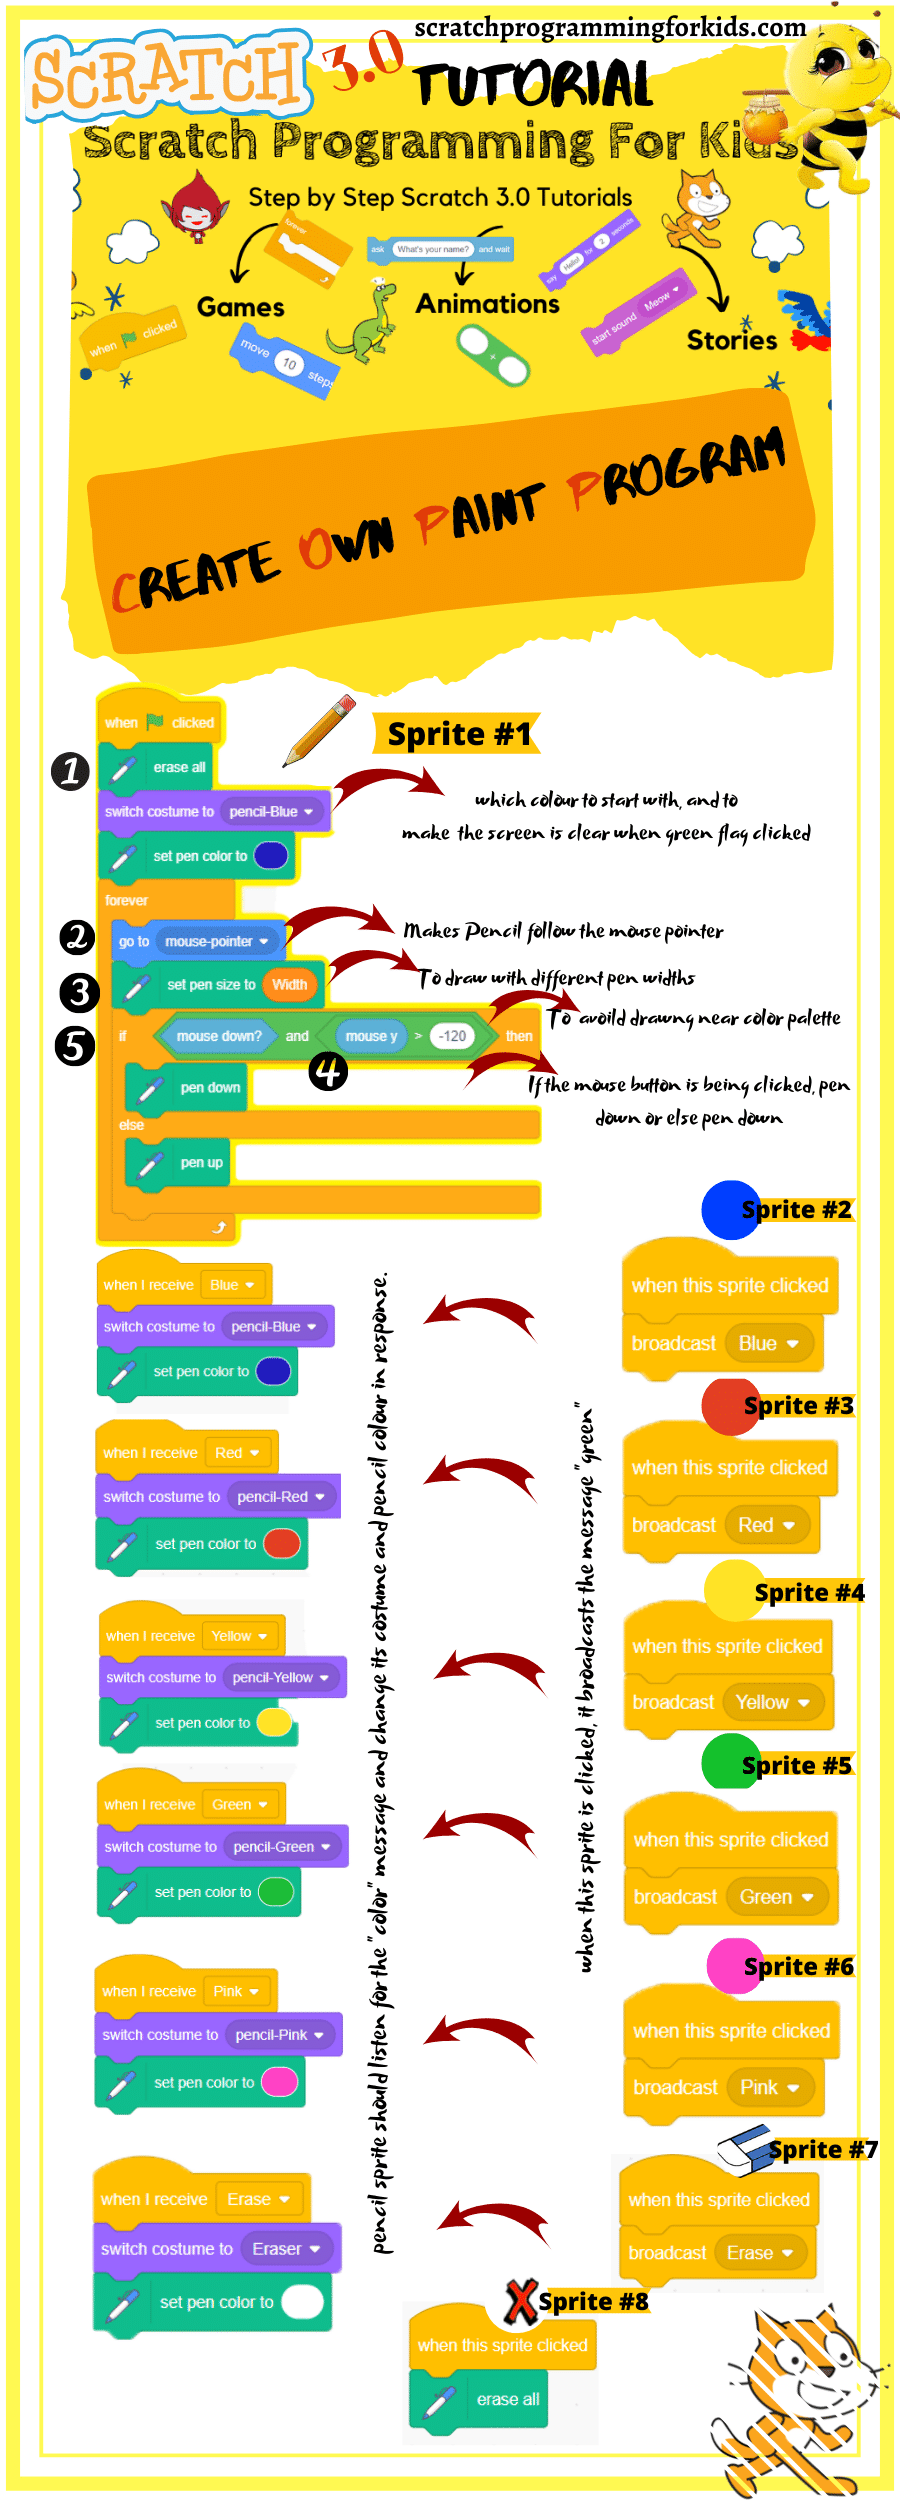
Step 1: Drawing with pencil.
Let’s start by creating a pencil, that can be used to draw on the stage.
As you will be using the mouse to draw, you will want the pen to always follow the mouse. whenever the mouse button is down the pen should be down, and when it is up the pen should be up.
Tip: Have you noticed that it’s the centre of the pen, and not the tip, that follows the mouse pointer?
To fix this, click on your pencil sprite, and drag the pencil to ‘Set costume center’.
Test your code again. Move the pen around the stage and hold down the mouse button. Can you draw with your pen.
Step 2: Change the Line color and Costume of Pencil.
Let’s draw with some different colours, and allow the user to choose between them!
Click on your pencil sprite, click ‘Costumes’ and duplicate your ‘pencil-blue’ costume and create different color pencil costume of your choice.
We’ll add some sprites at the side of the work area. The sprites will look like color block. If we click on a color block, it will change the colour of the line we draw and also change the colour of the pencil sprite costume.
Rename the Color block sprites so that they are called ‘blue’, ‘green’, Red, yellow and so on…
For Example, If the Green color block is clicked, it should broadcast the “Green” message to pencil sprite. The pencil sprite should listen for the “Green” message and change its costume and pencil colour in response.
Then add similar code to other color block so that Pencil sprite can switch the pencil line colour and its costume.
Finally, add the code to tell the pencil sprite which colour to start with, and to make sure that the screen is clear when your program started. (i.e, When Green Flag Clicked).
Step 3: Undo mistakes with eraser and clear button
Sometimes mistakes happen, so add a ‘clear’ button and an eraser button.
If Eraser sprite clicked, it broadcast the message “Erase” to Pencil Sprite. When the pencil sprite receives the ‘eraser’ message, it should switch its costume to the eraser and switch the pen colour to white, which is the same colour as the Stage!
Add the ‘X-block’ sprite from the library’s letters section. This sprite is the ‘clear’ button.When the ‘X-block’ sprite is clicked, it clear the Stage.
Step 4: Change the pen width.
Make the program more interesting by allowing the person using your program to draw things with different pen widths.
Create a Variable named Width, set the pen size to width instead of particular number. You can now drag the slider that is visible on the stage to change the pencil size.
Test Your Project
- Does the pencil sprite follow the mouse around?
- What happens if you hold the mouse button down and drag the mouse?
- Can you switch between the blue and green pencil colours by clicking on the blue or green square sprites?
- Test your project to see if you can clear the Stage and erase pencil lines?
- Test your project to see can you adjust the pen width?
To download the project files of the project Paint Program with Scratch 3.0 Click here. Also go through the another ineresting scratch 3.0 project of Animate Your Name using scratch 3.0 here,
I KNOW THAT HOW THAT